When you step out of BrowBeat Studio Dallas Advanced Microblading Experts™ with freshly crafted brows, you’ve already invested in artistry and precision mapping that sets you apart. But the journey to perfect brows doesn’t end at the appointment—it begins in your healing. The next 14 days determine how your brows soften, how pigments stabilize, and how natural your results will look for the next 12–18 months. That’s why we provide a fail-proof aftercare guide designed to protect your brows and ensure long-lasting beauty. More than a routine, it’s about understanding the science behind why brows heal the way they do.
In this section, we’ll break down three critical parts of the healing process that every client needs to understand: oxidation, swelling and size reduction, and the lightening and softening of pigments. Together, these explain why your brows look bold at first, why they shrink slightly in size, and why lighter colors—especially blondes—change dramatically during healing. When you understand these changes, the entire 14-day process becomes less stressful and more exciting.
Oxidation: The Invisible Science That Darkens Your Brows
Oxidation is the single most important scientific principle in the early days of brow healing. When pigment molecules are placed in the skin during microblading or ombré brow treatments, they are immediately exposed to oxygen. This triggers a natural chemical reaction. Just like an apple browns after being cut or metal rusts after being left in the rain, pigment darkens when exposed to oxygen. The difference is that in brows, this change is temporary and expected.
Within the first 24–72 hours, oxidation can make your brows appear much darker than the color you selected in the studio. Many clients feel alarmed: “Why do my brows look so bold?” “Will they stay this dark?” The answer is no. Oxidation is a temporary stage where pigment molecules are at their most concentrated and visible. As your body begins producing new skin cells, that new layer of tissue acts like a translucent veil, filtering and softening the color underneath. By the end of the 14-day process, brows appear more natural, less intense, and closer to the shade you originally discussed with your artist.
Oxidation and Pigment Chemistry
The pigments used in semi-permanent makeup are created from high-quality organic and inorganic compounds. Each molecule reacts differently with oxygen. Darker pigments (like deep browns or blacks) may oxidize to look richer or even slightly warmer in the first few days, while lighter pigments (like blondes) often oxidize into cooler, ashier shades before balancing out. These shifts don’t mean the pigment is “wrong.” They mean the pigment is doing exactly what science dictates.

Blonde Brows and Oxidation
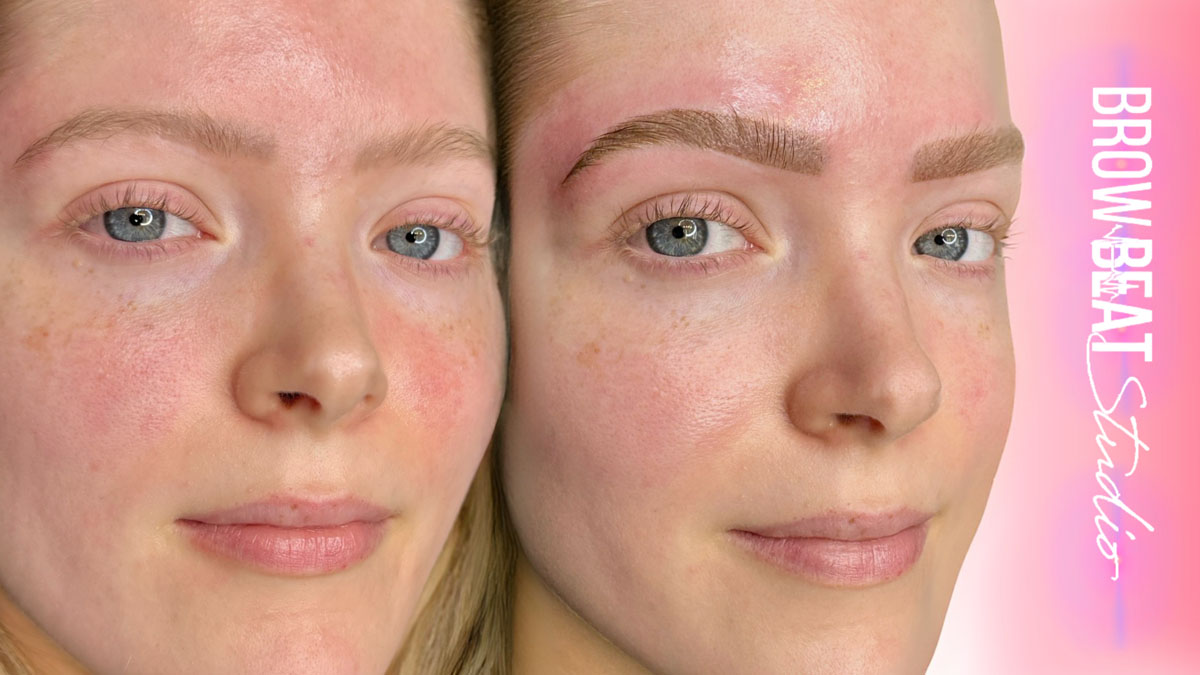
For blonde clients, oxidation is the most dramatic. Lighter pigments contain molecules that are more sensitive to oxygen exposure. That’s why blonde brows may initially appear darker, greyer, or more muted than intended. Clients often call this the “ghosting” stage, where brows look off-color. But by Day 10–14, as the skin finishes regenerating, the blonde shade softens and reveals the intended result: natural, delicate brows that match fair features. See examples in our gallery to understand how blonde brows shift over the healing cycle.
Undertones and Oxidation
Your skin undertone also influences oxidation. Warm undertones may bring out reddish or golden hues in early healing, while cool undertones emphasize ashy tones. At BrowBeat Studio Dallas Advanced Microblading Experts™, we select pigments with stabilizers to minimize unwanted shifts. Still, your unique chemistry plays a role. Understanding oxidation ensures you don’t panic when brows look different at Day 3 than they will at Week 3.
Size Reduction: Why Brows Appear to Shrink After Treatment
The second change clients notice is size reduction. Immediately after treatment, brows look slightly larger and bolder than planned. This is not a mistake. It’s swelling—a natural inflammatory response of the skin to micro-trauma. Each stroke or pixel creates microscopic openings in the skin. Your body sends fluid, white blood cells, and nutrients to repair the tissue, which temporarily puffs up the area.
As a result, brows look raised, fuller, and sometimes thicker in the first 48 hours. But by Day 3–5, swelling subsides. The lymphatic system drains excess fluid, capillaries stabilize, and collagen begins knitting the skin back together. This is when brows start to “shrink” into their true mapped size. What once looked bold and inflated now appears sleek, refined, and proportionate. Clients often mistake this reduction for pigment loss, but it’s really the skin settling into balance.
Precision Mapping and Size Changes
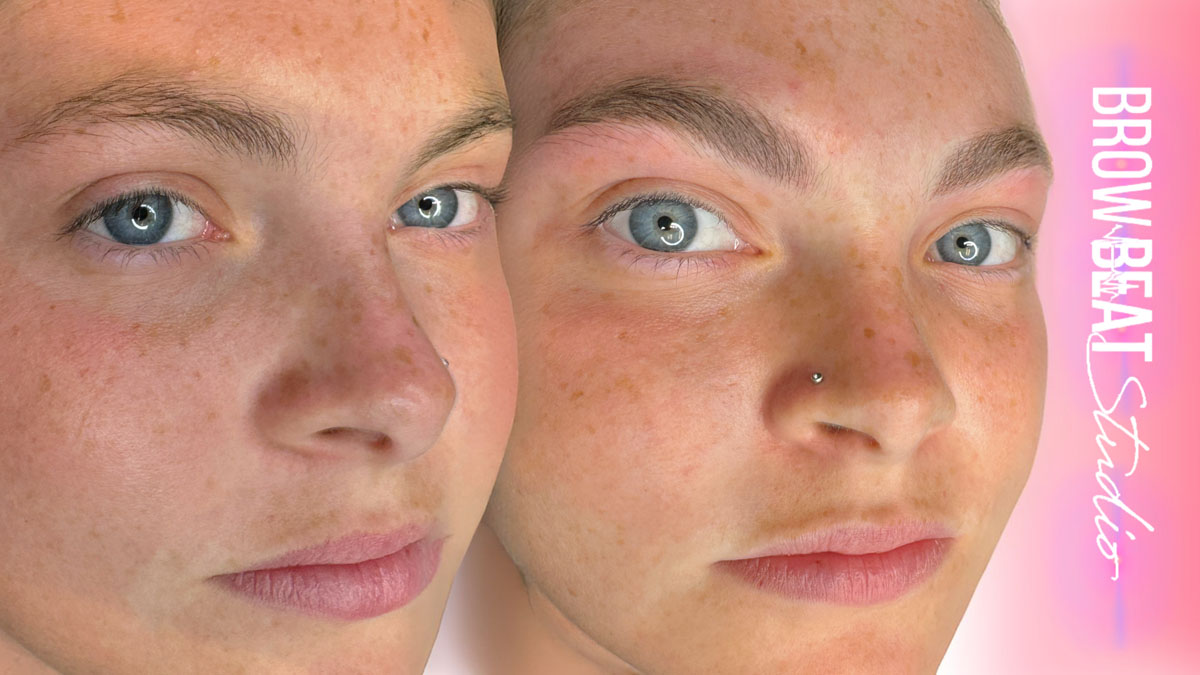
Our artists at BrowBeat Studio design brows with precision mapping techniques, accounting for expected swelling and healing changes. The slight overfullness you see on Day 1 is calculated, so that by Day 14, brows heal into the perfect shape for your face. This is why choosing an experienced studio matters—understanding how the body reacts to abrasion allows us to plan results that heal beautifully rather than unpredictably.

The Illusion of Pigment Loss
Because brows look smaller after swelling reduces, some clients think pigment is “disappearing.” In reality, the pigment is still there, embedded in the dermal layer. What you’re seeing is simply the skin flattening, making the design appear thinner. Trust the process: your pigment is intact, and your second treatment will refine and lock in the detail.
Lightening and Softening of Pigment
The third key transformation is pigment lightening. As your skin heals, tiny flakes or scabs form. These are part of the body’s natural wound healing process, where dead skin cells and lymphatic fluid dry on the surface before shedding. When these flakes fall away, brows look lighter underneath. This phase often occurs around Days 7–10 and is one of the most confusing for clients. They worry: “Did my pigment fall out?” “Did I do something wrong?” The answer is no—this is normal.
On average, pigments lighten by 20–40% depending on color depth. Blonde pigments may lighten even more dramatically, shifting from an initially ashy or greyish look to a soft honey tone. Medium and dark pigments may settle into a shade that looks more natural than their Day 1 boldness. The skin’s new layer filters the color, making it appear more muted, while the pigment beneath remains stable. By Week 3–4, true healed results are visible.
Why Blonde Colors Shift More
Blonde pigments contain less concentrated molecules, which means they are more vulnerable to both oxidation and the softening effect of new skin. This is why they change so noticeably during healing. Clients with blonde brows must be especially patient. By the end of the cycle, those brows will soften into the intended natural shade, but only if aftercare rules are followed faithfully.
Softening as a Sign of Healing
Softening isn’t pigment failure—it’s pigment success. It means your skin has regenerated, sealed, and is filtering the implanted pigment as intended. It’s proof that your body is doing exactly what it should. At BrowBeat Studio, we reassure clients that brows always look bold at first, lighter mid-way, and balanced at the end. The softening stage is the bridge between too-bold and just-right.
The Emotional Rollercoaster of the 14-Day Journey
Healing brows isn’t just physical—it’s emotional. Understanding the stages makes it easier to handle the mental ups and downs.
- Day 1–3: Brows look bold, dark, and swollen. Clients often panic. Science: oxidation + swelling.
- Day 4–7: Brows begin to flake or peel. Clients feel self-conscious. Science: epidermal shedding.
- Day 8–14: Brows look lighter, even patchy. Clients fear pigment loss. Science: new skin filtering pigment.
- Week 3–4: Brows balance, color stabilizes, true healed results shine through.

When clients know this cycle in advance, they are less likely to panic and more likely to follow their aftercare routine consistently. Emotional reassurance is as important as ointment or band-aids—because stress leads to mistakes like over-washing or picking, which can harm results.
Why Understanding the Science Improves Aftercare
The rules we give—no washing for 10 days, thin ointment layers, no picking, no makeup—aren’t arbitrary. They are built to support the science of oxidation, swelling, and pigment softening. By keeping brows dry, you protect pigment stability. By applying ointment thinly, you prevent suffocation of healing skin. By avoiding makeup or heavy creams, you reduce infection risk. Each step ties directly back to biology.
Clients who understand these connections are more committed to their routines. They see aftercare not as a chore but as a vital step in securing the brows they dreamed of. And that’s why at BrowBeat Studio Dallas Advanced Microblading Experts™, we prioritize education as much as artistry. We want you to know why your brows look bold on Day 3, why they look lighter on Day 10, and why they look balanced at Week 4. When you know the why, you trust the process.

Internal Links for Clients Wanting More
- Discover the artistry behind your brows on our Treatment Process page.
- Explore transformations across skin tones and hair colors in our Gallery.
- Secure your second treatment appointment at 4–8 weeks for perfected results.
- Have aftercare questions? Reach out through our Contact Page.
Your brows are more than a cosmetic procedure—they are science, art, and confidence combined. By mastering oxidation, size reduction, and pigment softening, you’ll understand why your brows look different each day and why patience pays off. The 14-day fail-proof aftercare routine we teach builds on this foundation, guiding you to results that last and brows that truly transform your face.
Your 14-Day Fail-Proof Aftercare Plan
Now that you understand the science behind brow healing—oxidation, swelling, and pigment softening—it’s time to apply that knowledge to a daily routine. At BrowBeat Studio Dallas Advanced Microblading Experts™, we give every client a step-by-step guide that breaks the healing journey into clear, manageable instructions. Follow these faithfully, and your brows will heal beautifully.
Day 1: The Critical First 24 Hours
Day 1 is all about cleansing and protecting. Think of this as setting the foundation for the entire two weeks ahead.
- Cleanse gently: Use the technique your artist demonstrated to remove lymphatic fluid that surfaces after treatment. Pat dry with sterile gauze or a clean paper towel.
- Apply ointment: Use a rice-grain amount of A&D ointment. Less is more. Apply thinly so the skin can breathe.
- Repeat: Wash–dry–ointment several times throughout the day to keep the surface clean.
- Night routine: Apply a thin layer of ointment, then place night-time band-aids over the brows to protect them while you sleep.
Nights 1–6: Protect with Band-Aids
From Night 1 through Night 6, you’ll apply night-time band-aids after a thin layer of ointment. This simple step prevents friction, keeps brows hydrated, and stops accidental rubbing while you sleep. Every morning, remove the band-aids, cleanse gently, and re-apply ointment every 2–3 hours during the day.
Days 2–4: The No-Wash Window
After Day 1, you enter the no-wash window. That means no direct water on the brows. Continue cleansing the rest of your face carefully, but avoid the brow zone completely.
- Apply ointment every 2–3 hours in thin layers.
- Avoid makeup, SPF, or creams on the brows.
- Stay dry: Skip swimming, steam rooms, or workouts that cause heavy sweating.
Expect brows to look bold and possibly swollen. This is oxidation + natural inflammatory response. Trust the process.
Days 5–7: Flaking and Texture
By Days 5–7, brows often begin to flake or peel. This is the skin shedding old cells as new layers form beneath.
- Do not pick or scratch. Let flakes shed naturally.
- Continue applying ointment every 2–3 hours to reduce dryness.
- Keep the brows completely dry.
Brows may look patchy or uneven during this phase. This is normal—it’s simply old skin leaving and new skin covering the pigment beneath.
Days 8–10: The Lightening Stage
This is when many clients panic. Brows often look much lighter, even “faded.” But this is only the pigment sitting beneath a layer of healing skin. As the skin clarifies, the true shade will return.
- Maintain the no-wash rule until Day 10.
- Apply ointment as needed, but don’t overdo it. Too much suffocates healing tissue.
- Stay patient. This is science at work—pigments always appear softer before they stabilize.
Day 11–14: Transition Back to Normal
At this point, the brows are sealed. You can carefully reintroduce gentle cleansing, but avoid exfoliants, scrubs, or retinoids anywhere near the brows.

- Wash your face normally, letting water run across the brows without scrubbing.
- Limit sun exposure—pigment is still vulnerable to UV rays.
- If dryness persists, continue applying a whisper-thin layer of ointment.
By Day 14, most swelling is gone, oxidation has balanced out, and pigment softening is well underway. Your brows are beginning to resemble their final healed look.
Day 15–Week 4: The Extended Phase
Aftercare doesn’t end on Day 14. The next two weeks are when pigments continue to stabilize under the skin. Brows may still look a bit lighter during Week 3, but by Week 4, the true color emerges.
- Color return: What looked “lost” during Week 2 reappears as the skin finishes renewing.
- Texture smoothing: Any residual dryness evens out.
- Natural finish: Brows now appear soft, refined, and camera-ready.
Second Treatment Planning
Microblading and ombré brows are a two-step process. Aftercare ensures the first treatment heals well, but true perfection comes with the second treatment at 4–8 weeks. This appointment refines detail, balances symmetry, and strengthens pigment retention. Secure your spot on our Booking Page now, so you don’t have to wait once your brows are ready.
FAQs About Aftercare
“Why are my brows so dark on Day 2?”
Oxidation. Pigments temporarily look darker when exposed to oxygen. This softens naturally by Week 2.

“Why do my brows look patchy around Day 6?”
Flaking is normal. As old skin sheds, pigment looks uneven until new skin covers the area evenly.
“Did my pigment disappear during Week 2?”
No. It’s under a layer of new skin, which filters the color. By Week 4, the true shade shows through.
“Can I go back to workouts?”
Light exercise is fine after Day 11, but avoid heavy sweat sessions until Week 3.
“Do blonde brows always heal lighter?”
Yes, blonde pigments soften more dramatically due to molecule size. But the final result matches the intended natural tone when aftercare is followed.
The Do’s and Don’ts of Fail-Proof Aftercare
Do
- Follow the exact Day 1 cleansing and band-aid protocol.
- Apply ointment every 2–3 hours in whisper-thin layers.
- Sleep on your back to protect brows from friction.
- Wear a wide-brimmed hat outdoors.
- Stay patient through bold, flaky, and light phases.
Don’t
- Don’t get brows wet during Days 2–11.
- Don’t pick flakes or scabs—let them shed naturally.
- Don’t use makeup, SPF, or skincare products on brows.
- Don’t expose brows to sun, tanning beds, or saunas.
- Don’t panic at color shifts—trust the process.

Why BrowBeat Studio’s Aftercare Method Works
Our fail-proof protocol is built from years of experience. The combination of Day 1 washing, the six-night band-aid system, and the 10-day no-wash window creates the perfect balance of cleanliness, barrier protection, and oxygen flow. Each step supports the science of healing, stabilizes pigment, and prevents infections. Thousands of Dallas clients have followed this guide with consistent, beautiful results.
Links for Clients
- Learn how your brows are designed in our Treatment Process guide.
- See brows from Day 1 to healed in our Gallery.
- Reserve your second treatment today.
- Send questions directly through our Contact Page.
- Return to our Homepage for all services.
Final Thoughts
Aftercare is not just a checklist—it’s the partnership between artistry and science. Oxidation explains why brows darken before they soften. Swelling explains why brows shrink into their true size. Pigment softening explains why colors shift before settling. Combine this knowledge with a 14-day routine, and you have the recipe for success. At BrowBeat Studio Dallas Advanced Microblading Experts™, we call this the fail-proof system. Follow it, and you’ll see your brows evolve into their best version—balanced, natural, and beautiful.
